Monday, September 7, 2009

Banana Bounty

Well, mango season is over in Lanikai. It is still possible to buy Hawaiian mangoes at the market. But $2.69 a pound is a hard price to pay when we had our fill for free.

On to the next crop: bananas! This time, instead of relying on the kindness of neighbors for fruit, we can harvest our own from the growing grounds at lanikai green house.

A couple of years ago we planted two 3 gallon dwarf apple banana trees. The first crop was tasty and more than we could eat ourselves. However, this year, the bananas are larger and more flavorful. We had to move quickly after the first bunch of close to 100 bananas (above) started to ripen.

At first I could cut off a half a dozen for personal use and wait a few days for the next half dozen. Then I had to cut off  a dozen every day or two.  One family can't eat that many bananas. We gave away dozens of bananas to our neighbors and to our mailman.

Each tree will only produce one bunch of bananas. A group of keiki, (offspring) trees have started to sprout at the base of the tree and will be ready for next year. Three more of the keiki from last year's crop also have bananas that will ripen this season. It looks like we will have bananas well into October.

Several ways that we have enjoyed our apple bananas this year:
  • Frozen bananas smoothies - Cut up ripe bananas and freeze. Store in an airtight container. Toss 3 to 4 inch long pieces of frozen bananas in the blender with 3 to 4 ice cubes, one frozen mango juice cube, one frozen Meyer lemon juice cube, two teaspoons Maui Cane Sugar. Cover with ice cold water and blend for a minute or so. Pour in a large glass and enjoy.
  • Fresh bananas and peanut butter on toast - Toast 3/8" thick slices of La Brea Bakery bread, either Pain Rustic or Organic Wheat Loaf. Spread with a thin layer of Skippy Creamy Peanut Butter and top with 1/4" thick slices of ripe apple bananas. Be careful when you pick up a slice to eat as there may be pukas or holes in the bread that will allow warm peanut butter to drip on your shorts or swimming suit.
  • Fresh banana smoothies - Put 3-4 cubes of ice in a blender with one half of a ripe apple banana, one half of a small ripe homegrown papaya, 2 tablespoons of plain yogurt, a small wedge of fresh Maui Gold pineapple, two tablespoons of orange juice and one teaspoon of Maui Cane Sugar. Cover with ice cold water and blend for a minute or so. Adjust as needed based on the type of ripe fruit available.
  • Roasted banana chips - Cut up a couple of ripe apple bananas into 1/8" thick slices. Use the back of a spoon to coat each slice with Coltibuono olive oil. Place each slice on a parchment paper lined tray. Bake for 12-15 minutes at 350 degrees and then flip each slice. Bake for another 12-15 minutes. Cool and then season to taste with a mix of chili powder, ground coriander and Hawaiian sea salt.


Enjoy the sweet and salty flavor and wash it down with a cool Steinlager Classic beer.

Tuesday, July 14, 2009

Memorable Mango Martini

The mango harvest continues! We found another way to enjoy the taste of mangoes long after the end of the season. Our recipe for mango martinis starts with mango vodka. There were several different recipes on the web for mango vodka but the concept was the same and very simple.

Put equal parts vodka and chopped fresh mango in a pitcher for 3-4 days. Strain out the mango and voila you have mango vodka. Use a cheese cloth for the final filter to remove the mango sediment.

The pleasure of a good drink is influenced by sight, smell, taste and memory. Use your best bar tools to mix this martini. The backdrop for this shot is a chair, we first saw in Le Marais district of Paris in the 1980's. It was designed by Philippe Starck for the Cafe Costes. The silver martini shaker and glass are from the 1920's and 1930's. Each is monogrammed with separate family initials and passed down through three generations to us. A lot of memories are mixed into each martini.

For two martinis pour the following into the martini shaker:
3 ounces of mango vodka
1/2 ounce of fresh squeezed lime juice
1/2 teaspoon of limoncello
Fill the shaker with ice cubes
Quickly shake and pour immediately.


Notice the soft color, smell the essence of Hawaiian mangoes, sip and enjoy sweet and tart blend bursting with flavor. Then save the memory.

Saturday, July 4, 2009

Mango Season

Contrary to what those on the mainland may think, there are four seasons in Hawaii, just not the normal - spring, fall, summer and winter. Mango season is recognized as one of the four Hawaiian seasons along with North shore swell, South shore swell and Humpback whale.

Here in Lanikai it is Mango season! Following the Hawaiian tradition, many of the gardens in our historic neighborhood have fruit trees. The biggest fruit tree to be found is the mango tree. Even better than having your own mango tree is having a friendly neighbor with a mango tree. When the fruit is ripe there is plenty to go around.

Tom and Nara have a large tree that is over 40 feet tall and 60 feet wide. There is a bumper crop this year. Mike, their tenant, has been collecting fruit with a long pole for the past couple of weeks. Every few days he puts several dozen mangoes on the wall with a "Free Mango" sign painted by his five year old son.

We decided to save some of Mango season 2009 for the dark cold days of Humpback whale season. Well, maybe not dark and certainly not cold, but a bit of mango in January would be nice.


We decided to try a mango jam recipe from Preserving The Taste, by Edon Waycott. Edon is a long time friend who lives in California. Her book (just one of her many wonderful books) is currently out of print. We are lucky enough to have an autographed copy.

So, on with the jam recipe.

The first step is to peel and cut up the mangoes. We use the "porcupine" method. Slice each mango lengthwise next to the flat pit. Make a grid of cuts just to the inside of the skin and then invert the mango to reveal the "porcupine".


Add two cups of sugar to about four cups of mangoes. We use Natural White Maui Brand Cane Sugar. It has a true sugar cane flavor.

Add three tablespoons of fresh lime (or lemon) juice.


Stir and let sit for about three to four hours. This is when some magic happens. Even without heat the mangoes begin to soften and release their moisture.

Bring to a boil and simmer for about 20 minutes. The amount of time for this stage is variable. It depends on the amount of moisture in the fruit, the amount of natural pectin and the mysterious jam goddess. We did not let the first batch go long enough so we have six jars of "Mango Syrup". The mango syrup has great flavor that will be put to good use on pancakes and over ice cream, but it is not mango jam. With more mangoes from our generous neighbors, we made a second batch. This time, we increased the cooking time enough for real JAM!


Ladle the jam into sterilized Ball mason jars.

Clean the rims with a moist towel and seal the jars with new lids. Process in boiling water for five minutes.


Check the seal and label for future use during Humpback whale season.

Friday, May 8, 2009

Limoncello - How Sweet It Is

This is our third blog post in the Limoncello series. The series began when we harvested Meyer lemons from our growing grounds here at the lanikai green house. Kathe then put the lemon zest in a special mix of alcohol for a long bath.

Bath time is over! Kathe removed the lemon zest. She set a strainer over a bowl to catch any alcohol drips.

During the past four months, the alcohol has extracted all of the yellow out of the lemon zests. The essence of all those lemon zests has turned the clear alcohol yellow.

About this time Socks made an appearance in the kitchen. It was time for his mid-morning feeding.

Kathe then prepared a simple syrup with four cups each of sugar and water. It was heated, for at least 7 minutes, to fully dissolve the sugar and then cooled to room temperature. The alcohol was strained to remove any fine lemon zest particles and then mixed with the sugar syrup.

In direct violation of Kathe's recipe, which says that the sugar syrup and alcohol should blend for a while before tasting, we decide to have just a wee bit. I thought it seemed to have more lemon aromatics than the last batch. Kathe thought the last batch had more lemon taste. Both of us could be right. Alas we are just going by memory since the old batch is long gone.

Once the mixture has melded for a week, we will taste the new batch again (and maybe again) to see what what we think.


I brought over two bottles from the last batch and Kathe had a few more, including one limoncello bottle that they brought back from Italy. She then sterilized the bottles with boiling water before filling them with Lanikai Meyer Lemon Limoncello.

cin cin!

Saturday, January 10, 2009

Limoncello - The Long Alcohol Bath

In this second blog of the Limoncello series we meet Kathe and start the long alcohol bath. Read the first post in this series Limoncello - The Lemons to catch up on the process.

The story really begins last year when Kathe and her husband Bill took a trip to Italy. The focus was not art, history or architecture but it was food. They had cooking classes, they ate and they drank.

This tea towel is a souvenir of their adventure. When they arrived back in Hawaii, Kathe set out on a Limoncello Mission. She searched for limoncello recipes both in cookbooks and on the web. She used her selected recipe and made her first batch for the 2009 holiday season. The second batch begins today.

Kathe takes the lemon zest, that came from the growing grounds at the lanikai green house, and puts them in a large glass jar with a tight fitting lid.

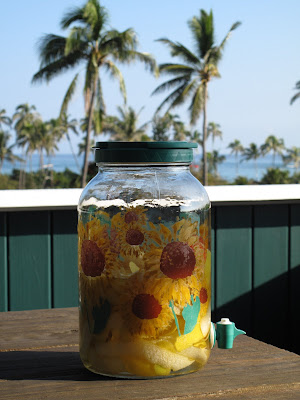
This jar was made for ice tea and has a handy dispenser that will be useful in a few months when the completed limoncello is put in small bottles. The zest from the 20 lemons nearly fills the jar.

This is the part where you have to make sure that you extinguish all open flames. Everclear grain alcohol is made by Luxco. For this recipe Kathe uses 151 proof but is is available in 190 proof. It appears that in Hawaii the strongest proof available is the 151 proof. It does the trick.

The recipe calls for one 750 ml bottle each of Everclear and vodka. But for this batch Kathe used one full bottle of Everclear and for the second bottle a mix of leftover Everclear and vodka. This batch should pack a bit more punch!

After Kathe gives the jar a good shake, the waiting process begins. From her research Kathe has found that the wait should be a minimum if one week but the longer the zest bathes in the alcohol the better the flavor.

This batch of lemon zest will get a four month bath. I brought the jar back to the lanikai green house and will put it in our cellar. I will give it a shake every once in a while. When Kathe returns to Hawaii in few months she will start the next step in the process: Limoncello - How Sweet It Is.

Friday, January 9, 2009

Limoncello - The Lemons


Our neighbor Kathe gave us some homemade limoncello when she came to the Our Better Angels Meet Anew party last month. Limoncello, ice cold from the freezer, erupts with the essence of lemon zest as the alcohol warms the back of the throat.

We decided that after the holidays to harvest some of our Meyer lemons and work with Kathe to make a new batch of limoncello. Her recipe call for the zest of 20 lemons. Our trees were so heavy with fruit we thought the branches would break.

Meyer lemons are not like the Eureka lemons sold in most markets. They have thin skins that are very aromatic and the juice is not as acidic. The reason that you do not see more Meyer lemons in the store is that they do not transport very well. The thin skins do not hold up to the normal citrus packing operations. As a result when you do see Meyers lemons in the store, expect to pay over $5.00 per pound. The large lemons in this tree weigh about one half a pound each.

We figured that if we bought Meyer lemons for this batch of limoncello at our local Foodland Market, eight pound of lemons would have set us back about $40.00. Lucky we have our orchard. We decided to use the table outside to prepare the lemons. We did not want the lemon juice to add any more patina to our Carrera marble counters.

Percy checks out the lemons.

Percy decides that the beauty of the lemons is no match for his eyes.

Here in Lanikai you can cook outdoors in the middle of winter. Brr, it got down to the low 70's this morning. Here I am using a OXO vegetable peeler. Kathe lent me this tool and it works great. She told me not to use my Microplane zester. Her recipe calls for larger pieces of zest.

I still remember the time in New Orleans that the chef prepared Crepes Suzette at the table for us. With an orange on a fork he used a knife to quickly carve a long spiral of zest. The zest was then drenched in Grand Marnier and lit. The flaming essence of orange zest covered our crepes. I remember food highlights for a long time. We had that desert over 20 years ago.

After a short while using Kathe's great OXO peeler, I have a platter full of the zest of 20 Meyer lemons.

We had been thinking of what to do with all the lemons. I decided to go out an buy an ice cube tray and freeze the juice, then Kathe offered to let me borrow her ice cube tray. She thought of the same solution when she made limoncello before.

But first I had to juice 20 lemons. The tool I like is the Williams Sonoma citrus juicer. This tool can adjust for both lemons and limes. The only problem was that the supersized 1/2 pound lemons had to be cut into quarters to fit in the tool.

The lemons yielded close to 3 quarts of juice. We will have to fill this tray 3 or 4 times to create our Meyer Lemon Juice Cubes. They will add a touch of summer to our long winter here in sunny and warm Lanikai.

We will freeze the lemon pulps on a tray and then keep them in the freezer as well. Toss one in the garbage disposal for a fresh lemon scent.

Tune in for the next posting: Limoncello - The Long Alcohol Bath.